 Photo by Joël in 't Veld on Unsplash You just said your thanks to your captivating guest, he said you’re welcome. It was an interesting interview. You pressed the stop button, the recording stops. After the guest leaves, you listened back to see if your questions are tight. You press play and first thing you hear is a loud hiss. A recurring static noise in your recording is caused by one or more than one reasons that I will try to tackle in this article. Let’s start from the farthest possible source of noise until we reached the embedded waveforms on your screen 1. Outside your house or building. You don’t really have a lot of control on what’s happening outside your place of recording. Your neighbour’s split AC is probably near your window or it could be a windy day and dried leaves are rustling outside. If closing the windows doesn’t help and if you have a mobile recording gear (laptop setup or a standalone recorder), you can go around the house and find a quieter spot to do a test recording session. It could be a room away from the road, or a room that doesn’t share the exterior wall of the house. A walk-in closet usually fits this criteria. If the temperature and space is comfortable enough, a walk-in closet can shield your recording from the noise happening outside your home. Not to mention the added benefit of solving your reverb issues by the sound absorption qualities of the fabrics around you. 2. Inside your room/office.It’s easy for our ears to get used to a background noise, and make that as the baseline for our silence. It’s the same reason why white noise is effective as a sleeping aid. So the hiss on your recording could just be a low-level noise you’re used to hearing everyday. It could be your air conditioning or your fluorescent lighting. You could try a lot of workarounds for those like moving away as far as possible to the noise, or you could blast the room with cold air then turn it off while recording. You could switch to LED bulbs that are quieter. The key thing is to identify the source, experiment on reducing it, then make a test recording and compare. Other culprits could be your desktop and laptop computer fans, voltage regulators, air filters. Anything that runs on electricity is a possible culprit. 3. Microphones Matter but Not That Much. Every single microphone on the planet has a varying amount of noise floor (sometimes called self-noise). That’s the amount of noise that the electrical components in the mic contributes to your recording. In theory, the lower the noise floor of a mic, the less hiss you get in the recording. A Studio Projects B1has a noise floor of 12 decibels, which is already considered quiet for a condenser mic. A Rode NT1 has an ultra-low noise floor of 4.5 decibels. The more you read about microphones, the more alien terms starts popping up: signal to noise ratio, diaphragm sizes, proximity effect, Brownian movement. Save yourself the headache and just start with whatever mic you have right now. Or if you are looking to buy a microphone for the first time, stick to shopping for a cardioid mic. A cardioid mic is a microphone that picks up sound mostly at a single side as opposed to other microphones, like for example an omnidirectional mic that picks up sound at 360 degrees. 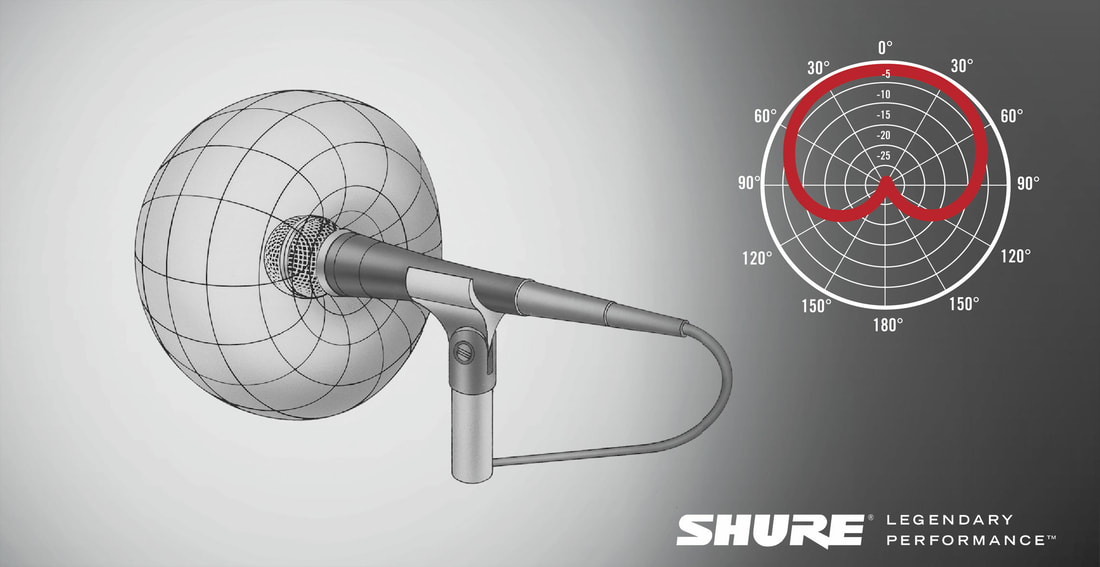 An illustration of where a cardioid mic picks up sound. Image from shure.eu Why then microphones doesn’t matter that much? Well for one, mics can get really expensive. Unless you have a big name sponsor on your show, then go ahead and splurge on a $3000 Neuman U87. Another reason, cheaper mic under known brands (shure, rode, audio technica, etc.) are pretty decent. I’ve edited recordings made with a cheap Shure SM58 (which is actually built for live sound) and it sounded great. As long as you take some time to learn some simple recording techniques, you can always get a broadcast quality sound with it. Which brings us to number four. 4. Record Loud. Since there is an underlying noise in the electrical components of your mic and in your surroundings, you need to make sure that your voice gets recorded louder than than the static noise (high signal-to-noise ratio). How do you that? In the case of recording a podcast, the most you can do is to stop yourself from whispering in the mic. What it does is, it prevents you from adding more gain to your mic just to reach proper levels. This ensures that the noise stays at a minimum and quite insignificant in comparison to the loudness of your voice. The best analogy to that is ‘a drop of yellow paint won’t turn a cup of blue to green.’ Another way to make the signal recorded (your voice) louder is to speak closer to the mic. Now, some mics can make your sound muddy if you speak too close to it (proximity effect), but some mic, like the Studio Projects B1, have a built-in high pass filter in their circuit that enables you to speak closer without that extra bass. Again, you need to experiment with your mic distance to find the best compromise between muddiness and hiss. 5. Mouth Clicks. A quick side note. Mouth clicks doesn’t contribute to your recurring hiss, but it can be annoying for you and your listeners. So quick tip, hydrate well before recording and try sipping fruit juices every once in a while during a recording session. There’s something about the consistency of fruit juices that helps reduce the clicking sound in the mouth. 6. Keep Cables Short (and of Quality). The signal coming from your mic to the audio interface isn’t really very strong. And the longer it travels, the weaker it gets. To maintain the quality of signal, minimize its travel by opting for a shortest mic cable possible. You don’t really need a 10-foot cable between your mic and your audio interface if both of those is on the same desk. Quality of cable is also something you could look into. Well built cables have better shielding that prevents any interference from other radio devices like your phone or your kid’s RC car. Pig Hog makes three-foot cables under 15 dollars. Planet Waves (a brand I personally use) has 5-footer under 20 dollars. So it’s not really an expensive investment in your sound. You can even make one yourself if in case you know how to do soldering. You just need to make sure you get quality cables and plugs. 7. Isolate the Mic  Photo by Jonathan Velasquez on Unsplash Sound is the vibration of any medium it travels to. In the case of two people talking, sound is just vibration of air molecules. But sound can travel to just about any medium. To your floor, to your desk, to your mic stand, until it gets picked up by your mic. A mic shockmount isolates your mic that results in reduced transmission of noise from your mic stand. So for example you have a water pump running in your basement and is sending vibrations to the wall and then to floor that you are standing on, a shockmount can help you against a noise transmission like that. Like quality cables, a shockmount is a cheap addition to your rig that can yield a lot of improvements to your sound. Some are just ten bucks, or you can even make one yourself. But if you are going to buy one, make sure it fits your microphone.
8. Keep the Recording Gears at a Minimum. At number 3, we discussed microphones having a noise floor. Truth is, every single piece of recording gear in your recording chain has a noise floor that contributes to the overall hiss of your audio. The recording technology of today have made a lot of leaps since the days of tape machines and tube preamps. You can get pristine sounds with just a mic and an audio interface. Don’t get me wrong, outboard hardware gears are useful in a lot of situations like live sound and broadcast. Boutique (expensive) analog gears are useful in adding warmth in an ultra-quiet studio recording. But for a podcaster who records their episodes in a dining room and still learning the ropes of recording, hardware gears will only add complexity to an already complex process of recording. Not to mention the amount of noise added everytime you add a gear to the chain. Keep it simple. A mic and an interface is more than enough. I’ve had clients send me recordings made with just a Blue Yeti USB mic and it still sound great. 9. Record on Separate Channels The reasoning behind this is quite simple. You don’t want your guest’s static noise to bleed in your own tracks. You’ll have a hard time editing out your guest’s noise when it’s happening as you speak. If you and your guest (and your co-host) are recorded on a separate channel or track, you can easily deal with the noise on each individual tracks. 10. Noise Reduction in the Edit. You can’t really eliminate noise in your recording. Our main aim here instead is to have a higher volume of the desirable signal (your voice) against the underlying noise. In audiospeak, it’s called ‘high signal-to-noise ratio’. A high signal-to-noise ratio will make it easier for noise subtraction and noise gate plugins to do it’s magic. A high signal-to-noise ratio plus a little dash of noise removal processing is the start of a really crisp sound. Dealing with noise in the editing phase is something that warrants a higher word count so I won’t go into detail here. You can always search for specific instructions on the included noise reduction plugins in your editing software. But with a little understanding on where the noise coming from, there’s a big chance that you won’t have to deal with it in the editing. I wrote this article because hiss is something I deal with on a daily basis both in recording and editing and I am a little surprised with people, who are new to recording, that deals with the noise in a counter-productive way like buying a new mic (though that helps only to some extent), or adding an additional piece of gear, or relying a lot on editing, when in fact simple adjustments to how you record can yield more results. I probably missed something here or you probably have experienced the opposite of what I wrote. Or maybe you have a related question. If that is the case, let me know in the comments below. Also, please note that the product links in this article are affiliate links. I get a tiny percentage when you click the link and buy something but it does not add up to the product’s actual price. It does feels nice to earn a few cents off this article.
0 Comments
Leave a Reply. |

AuthorMy name is Drew. I'm an audio engineer by trade. This is my portfolio and blog site. I write audio articles here and at Medium. You can check out my portfolio over here. Archives
April 2019
Categories |

 RSS Feed
